I am delighted to have discovered bunny.net. Opening up new possibilities; they provide a simple, fast and affordable CDN in 2026. Now it’s easy for anyone to hop in.
In this review I’ve gone through the nuts and bolts of bunny.net.
Easy bunny.net Review Index
Below I’ve covered the essential bits. Trust me — it’s all easy!
- bunny.net Speed Test
- CDN Setup Step-by-Step
- Free SSL Secure Connection
- Installing CDN on WordPress
- Questions & Answers
bunny.net Speed Test
First things first! To get an idea of what kind of benefit and speeds to expect, I’ve conducted a simple test with the Pingdom website speed tool.
I’ve run the test with a page on my WordPress blog that loads a 10MB image file to see how long it takes to load — comparing both; with and without the CDN enabled.
Test 1: Near Server & CDN Disabled

First, I ran the speed test without bunny.net from the closest location to the actual website, which in this case was “New York City, US“.
So far so good — the site is well optimized and on fast VPS hosting which loads the heavy page in just 2 seconds from nearby or well connected locations.
Test 2: Far from Server & CDN Disabled
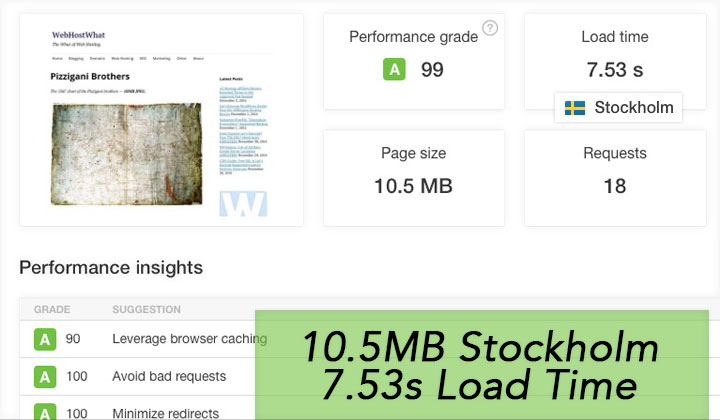
Next I’ve done the test again without CDN; but this time from a location on the other side of the Atlantic Ocean in Northern Europe: “Stockholm, Sweden”.
The load time has suffered greatly because of the distance between locations. A typical situation that needs to be solved with a Content Delivery Network.
Test 3: Far from Server & CDN Enabled
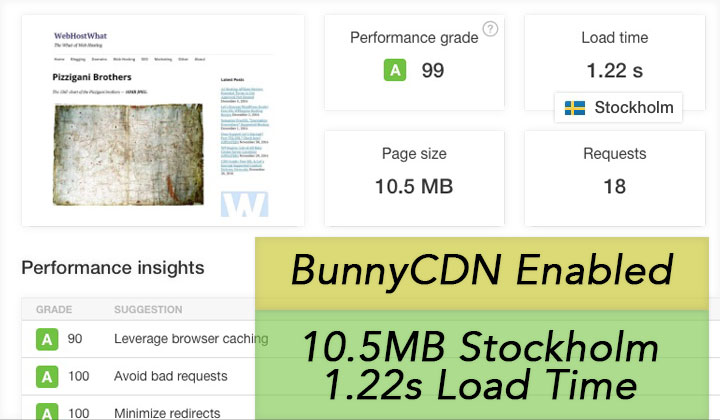
Now with bunny.net enabled — we are back to speeds and interestingly it’s even faster than in the US. That is simply because the files are cached on the CDN’s server in Europe, so the speed is between those two points.
I have to say I am impressed by the results. Obviously speeds will vary on any CDN service depending on different factors like the type of connection a visitor has, but overall we can conclude that their “lightning fast CDN” claims are justified.
There are a total of twelve different CDN locations around the world which is enough for most visitors to get optimal speeds from the nearest bunny.net network. On top of everything we are spoiled with price — the cheapest rates on the market starting at $0.010/GB of transfer. So it costs peanuts for most sites to run.
CDN Setup Step-by-Step
Having tried many of the popular CDN services, I’ve never before seen an easier interface for setting up the “pull zone” needed to utilize CDN. These are the steps.
Step 1. Register with bunny.net
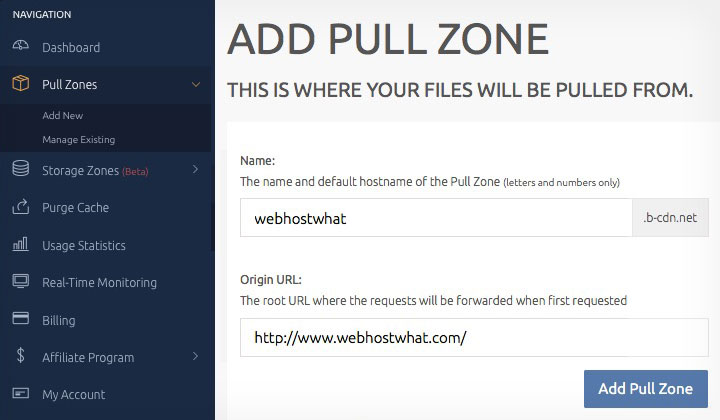
Step 2. Navigate to “Pull Zones” and “Add New” on dashboard
Step 3. Enter website name as “Name” & website URL as “Origin URL”
Step 4. Save with “Add Pull Zone” button
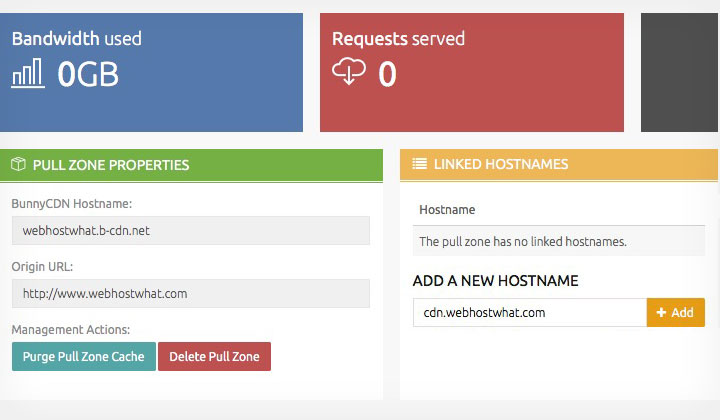
Optional Step — create own CDN hostname, recommended!
Step 5. Fill in desired hostname, usually “cdn.domain.com” and “+Add”
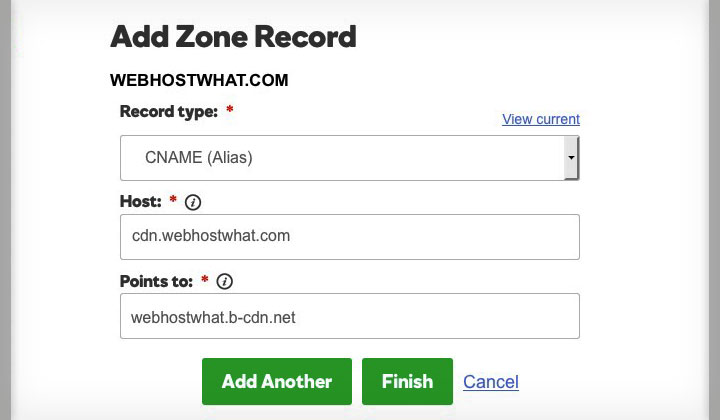
Screenshot from Godaddy DNS Zone Editor..
Step 6. Go to your domain registrar and add the CNAME record “cdn.domain.com” to point to the bunny.net Hostname, eg: “yoursite.b-cdn.net”
Step 7. The CDN is setup and ready to use. You can use the service for free during 14 days or until you transfer a terabyte (1000GB) of traffic.
To continue using the service use the client area to easily charge your account balance – bunny.net is unbeatable value » just $0.010 per 1GB of traffic and no hidden charges to worry about either. Bitcoins accepted!
Free SSL Secure Connection
Value doesn’t stop there, bunny.net supports free Let’s Encrypt SSL/TLS certificates to use HTTPS for the CDN connection. They are trusted by all browsers and devices like regular commercial SSL certificates (& easy to setup on WordPress).
This means that you can easily encrypt the connection between the CDN and your visitors. As a result, Google will give you a boost in rankings and you will increase trust with your website visitors of course. In modern times SSL is considered a must for any business or serious website.
Read: Find out about all the bunny.net features
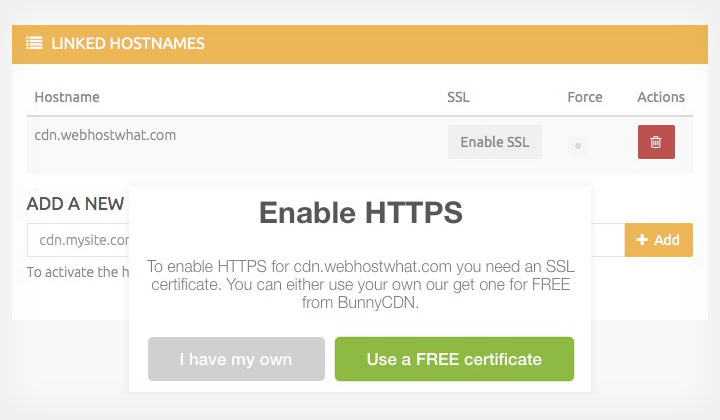
There is only one step! — Go back to the client area and look for the “Enable SSL” button for your CDN linked hostname. And that’s all there is.
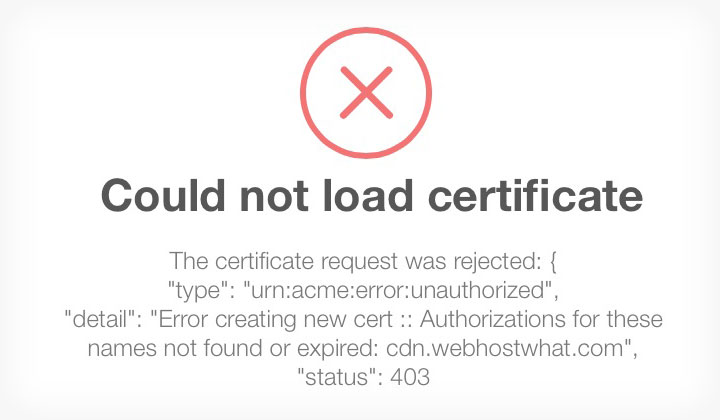
Please note that you need to have the CDN hostname working before you enable it or otherwise you will see the error message above or something similar.
Also it’s important to understand that this secures the connection between CDN and visitor only. To secure the connection between your website and CDN (very important for full security) — you will need another SSL certificate setup with your hosting provider.
Tip! Here’s a list of hosting companies that offer free SSL.
bunny.net server locations
Continuing to update their network of PoPs or Points-of-Interest which reduces latency for destinations around the world, here are the current country locations;
North & South America: Seattle, San Jose, Los Angeles, Chicago, Dallas, New York City, Atlanta, Miami (US), Sao Paulo (Brazil), Toronto (Canada).
Others: Moscow (Russia), Johannesburg (South Africa)
Asia: Bangkok (Thailand), Tokyo (Japan), Hong Kong (China), Singapore (Singapore), Brisbane, Perth, Melbourne, Sydney (Australia), Auckland (New Zealand).
Europe: London (UK), Amsterdam (Netherlands), Paris (France), Madrid (Spain), Oslo (Norway), Vilnius (Lithuania), Milan (Italy), Prague (Czech Republic), Warsaw (Poland), Frankfurt (Germany), Istanbul (Turkey), Bucharest (Romania).
That is currently 34 data center locations in 2026.
Installing CDN on WordPress
Last but not least, you will need to enable CDN for your WordPress website with an easy to use plugin. Other CMS have similar extensions available.
I will show you the best and easiest way, both paid & free.
Recommended: WP Rocket
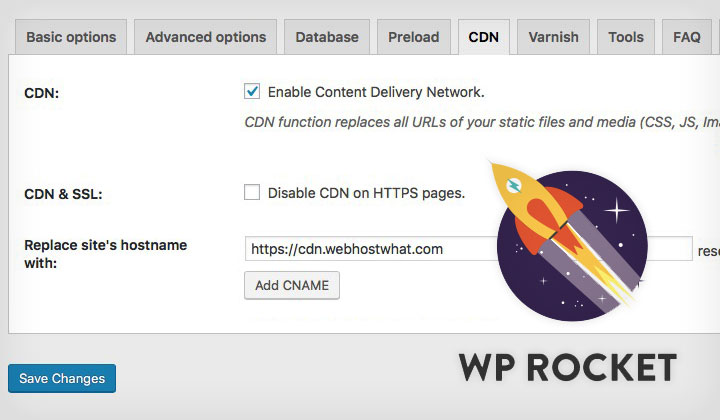
Enabling CDN for your WordPress website or blog is as simple as filling out the newly created hostname and saving changes. But WP Rocket provides much more than that, it is also a fully versed caching plugin and speed optimizer.
Caching and other optimization techniques such as JavaScript and CSS file minimizing is a must for anyone who is concerned about website speed. Having CDN and Caching on the same plugin makes sure that they work together without problems.
Read: bunny.net has instructions for setting up WordPress & more
Sorry — I haven’t been satisfied with the freely available plugins, but I will continue research and update accordingly.
Questions & Answers
Any questions about CDNs? Just leave a comment in the box below and good questions & answers are added to the stack. Thanks!
Do I need to create my own hostname for the pull zone?
Simple answer is no. However there are possible benefits of using a hostname, eg: “cdn.mydomain.com“, instead directly using the provided subdomain from bunny.net, eg: “yourname.b-cdn.net” but they are not obvious. Setting up a CNAME with your domain registrar is easy, and something you won’t regret. In terms of SEO it just looks better to use your own domain instead of someone else’s.
If you are unsure about setting up a CNAME — your registrar will provide instructions for it. If it seems straight forward enough for you, I recommend it!
Which is better, Cloudflare or bunny.net?
The popular free version of Cloudflare is not really a real CDN and is lacking on features, and security, however it is a good basic way to tackle global speed issues for small websites and blogs. Paid plans are significantly more expensive with Cloudflare than bunny.net. Also Cloudflare doesn’t provide free TLS/SSL like bunny.net does and it’s not as easy and intuitive to use in my humble opinion.
Please note: The service has changed it’s name from BunnyCDN or Bunny CDN to bunny.net in January of 2021.
Questions, comments are most welcome thanks!
Tims – I was doing some research to find a decent CDN and at first I was trying KeyCdn until I saw your article about pricing. You recommend Bunny so I’m checking them out now.
My question is, why don’t you use a cdn? I’m not trying to be funny but I’m just wondering whether there’s an argument for not using them.
Thanks again for the article and a great site.
Steve
Great article, currently using CloudFlare but I’ll try BunnyCDN.
Thanks for your comment. If you want proper SSL security, Bunny CDN will definitely be cheaper. Tim.
Not everyone needs a CDN. If I would have an ecommerce site for example, I would definitely use one. Reason why I’m not is that I need to serve content to mainland China visitors for which most CDNs are not truly optimized.
also, what I can see is, bunny.net doesn’t provides good APIs. I don’t know how we can do for automation?
Hi,
I’m interested in using CDN for my websites but I don’t know how I can configure it? Do you have any suggestion or templates for different types of websites? Mine now is a simple intro websites with static contents and few images but later will have shopping carts with few plugin videos…